Quick Recipe Version (TL;DR)
Quick Ingredients
- 2 medium yellow onions, thinly sliced
- 2 tbsp unsalted butter (for onions)
- 1 tbsp olive oil
- 8 slices sturdy sandwich bread or sourdough
- 4 tbsp softened unsalted butter (for bread)
- 2 cups (about 8 oz / 225 g) shredded sharp cheddar cheese
- 1/2 tsp kosher salt, plus a pinch for onions
- 1/4 tsp freshly ground black pepper
- 1 tsp balsamic vinegar (optional, for onions)
- 1/2 tsp fresh thyme leaves or 1/4 tsp dried thyme (optional)
Do This
- 1. Slowly caramelize sliced onions in butter and olive oil over medium-low heat, 25–30 minutes, until deep golden and jammy; season and splash with balsamic if using.
- 2. Butter one side of each bread slice. Flip and lightly season the unbuttered sides with a pinch of salt and pepper.
- 3. On the unbuttered side of 4 slices, layer cheddar, a spoonful of caramelized onions, then more cheddar; top with remaining slices, buttered side facing out.
- 4. Heat a large skillet over medium-low. Add sandwiches and cook 3–4 minutes per side until bread is deeply golden and cheese is fully melted.
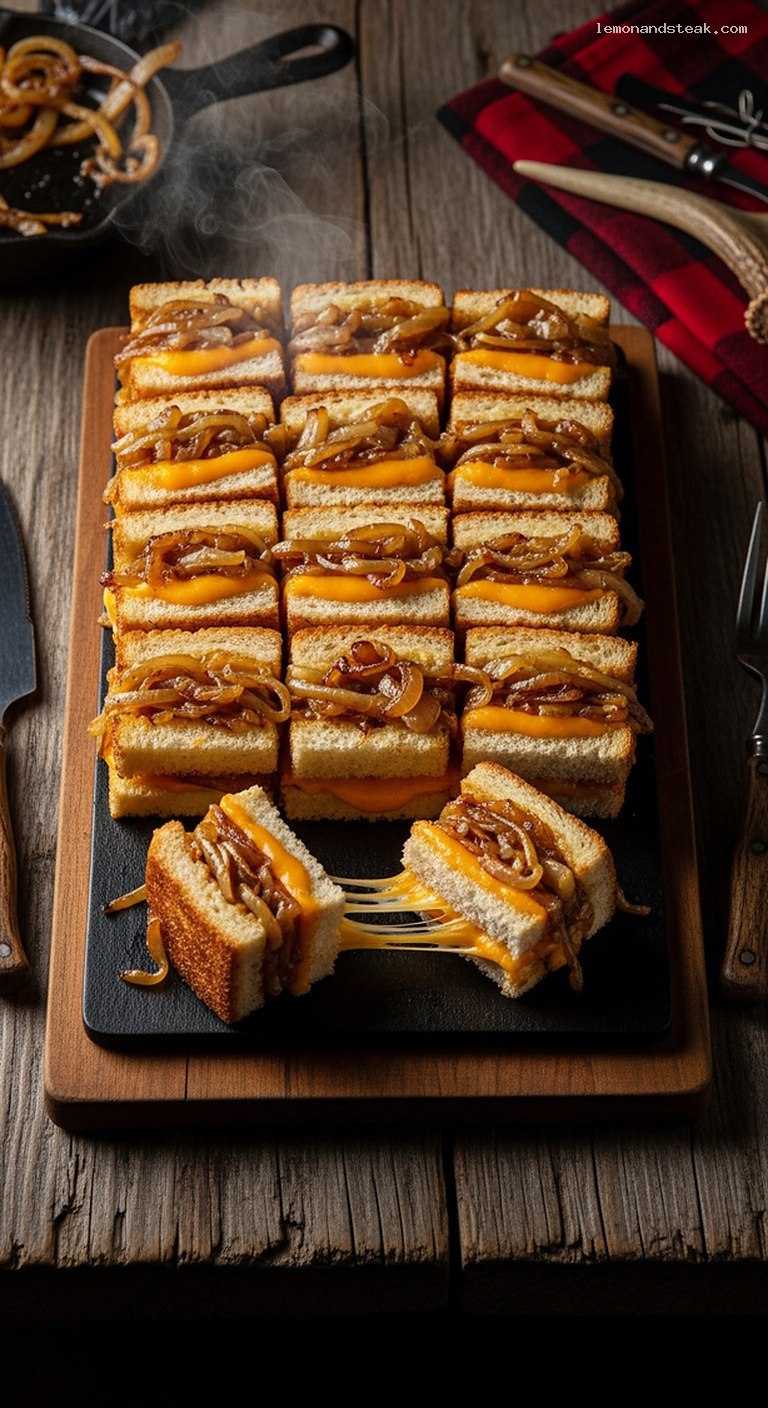
- 5. Let sandwiches rest 2 minutes, then trim crusts if desired and cut each into 6 bite-size squares or rectangles.
- 6. Serve warm on a platter, optionally sprinkled with extra thyme or flaky salt for a little finish.
Why You’ll Love This Recipe
- All the nostalgic comfort of a classic grilled cheese, reimagined as tidy, party-ready bites.
- Deeply caramelized onions add a grown-up sweetness that pairs perfectly with sharp cheddar.
- Built from simple, accessible ingredients you probably already have on hand.
- Easy to scale up for a crowd, and just as good for a cozy movie-night snack.
Grocery List
- Produce: Yellow onions, fresh thyme (optional).
- Dairy: Unsalted butter, sharp cheddar cheese.
- Pantry: Sandwich bread or sourdough, olive oil, kosher salt, black pepper, balsamic vinegar (optional).
Full Ingredients
For the Caramelized Onions
- 2 medium yellow onions, halved and thinly sliced (about 4 cups raw slices)
- 2 tbsp unsalted butter
- 1 tbsp olive oil
- 1/4 tsp kosher salt (plus more to taste)
- 1/8 tsp freshly ground black pepper
- 1 tsp balsamic vinegar (optional, for a gentle tang and deeper color)
- 1/2 tsp fresh thyme leaves or 1/4 tsp dried thyme (optional, but lovely)
For the Mini Grilled Cheese Bites
- 8 slices sturdy sandwich bread or sourdough (about 1/2-inch thick)
- 4 tbsp unsalted butter, softened (for spreading on bread)
- 2 cups (about 8 oz / 225 g) sharp cheddar cheese, coarsely shredded
- 1/4 tsp kosher salt
- 1/8 tsp freshly ground black pepper
Optional Garnishes
- Extra fresh thyme leaves
- Flaky sea salt
- Small pinch of smoked paprika or cayenne for a hint of heat
Step-by-Step Instructions
Step 1: Slowly Caramelize the Onions
Set a large skillet (preferably stainless steel or cast iron) over medium heat. Add the 2 tbsp butter and 1 tbsp olive oil. Once the butter has melted and is lightly foaming, add the sliced onions and sprinkle with 1/4 tsp kosher salt and 1/8 tsp black pepper. Toss to coat the onions in the fat.
Reduce the heat to medium-low. Cook, stirring every few minutes, for 25–30 minutes. The onions will first soften and turn translucent, then gradually become golden, then deep caramel-brown. Scrape up any browned bits from the pan with a wooden spoon and stir them into the onions. If the pan looks too dry or the onions begin to stick or scorch, lower the heat and add 1–2 tsp water at a time to loosen.
When the onions are a rich, jammy golden-brown (around the 25–30 minute mark), stir in the 1 tsp balsamic vinegar and thyme, if using. Taste and adjust seasoning with a pinch more salt if needed. Remove from heat and let cool slightly while you prepare the bread and cheese.
Step 2: Prep the Bread and Cheese
While the onions finish cooking, shred the sharp cheddar cheese if you have not already. You want fairly coarse shreds so they melt nicely and create gooey layers between the bread and onions.
Lay out the 8 slices of bread on a cutting board. Spread one side of each slice evenly with softened butter (about 1/2 tbsp per slice). This will be the outer side that touches the skillet and turns crisp and golden. Flip the slices so the unbuttered sides are facing up.
Lightly season the unbuttered sides with a very small pinch of salt and pepper. This step is optional but helps every layer of the bite taste well-seasoned.
Step 3: Layer the Cheese and Caramelized Onions
On the unbuttered side of 4 slices of bread, sprinkle about 2–3 tbsp shredded cheddar per slice, covering the surface all the way to the edges. This bottom layer helps “glue” the onions to the bread.
Spoon about 2 tbsp caramelized onions over the cheese on each slice, spreading in an even layer. Aim for a generous but not mountainous layer; you want the bites to hold together neatly when cut.
Top the onions with another 2–3 tbsp cheddar per slice to create a second cheese layer. Place the remaining 4 bread slices on top, buttered side facing out, to form four complete sandwiches.
Step 4: Grill the Sandwiches Low and Slow
Heat a large skillet or griddle over medium-low heat. Give it a minute or two to warm up; low, steady heat is key to melting the cheese fully without burning the bread.
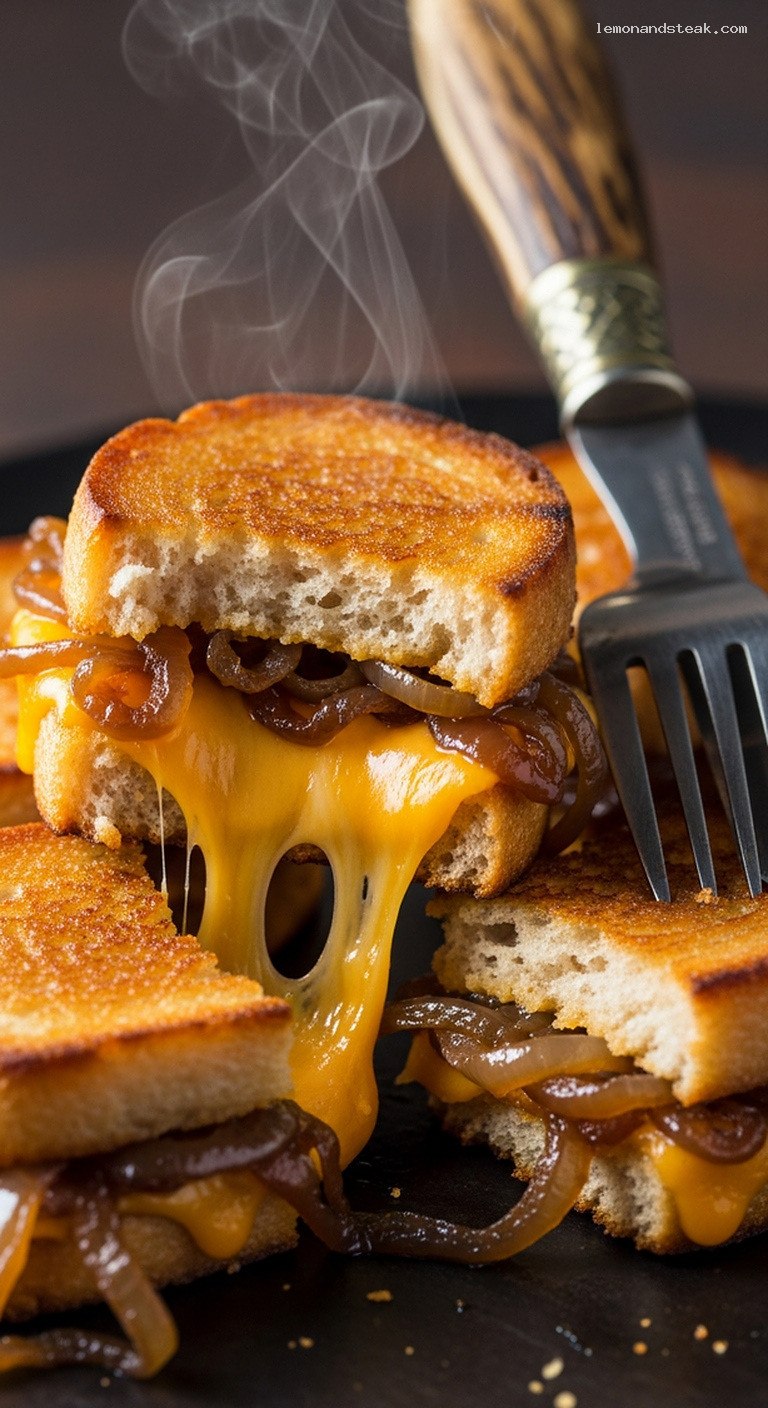
Place the sandwiches in the skillet, buttered side down. Cook for 3–4 minutes, until the bottoms are deeply golden and crisp. Gently press each sandwich with a spatula to encourage even browning and melting.
Carefully flip the sandwiches and cook the second side for another 3–4 minutes, until the bread is golden-brown and the cheese is fully melted and stretchy. If the bread is browning too quickly before the cheese melts, reduce the heat to low and cover the skillet for 1–2 minutes.
Transfer sandwiches to a cutting board and let rest for 2 minutes. This helps the cheese thicken slightly so the bites stay neat when sliced.
Step 5: Cut into Mini Bites
With a sharp knife, trim the crusts from the sandwiches if you want perfectly square, cocktail-style bites (this is optional; the crusts add rustic charm and extra crunch).
Slice each sandwich into 6 small pieces. You can cut them into:
- 3 strips, then cut each strip in half for tidy rectangles, or
- 2 cuts each way to make 9 smaller squares per sandwich, if you want more, tinier bites.
Arrange the mini grilled cheese bites on a warm platter or wooden board, showing off the melted cheese and caramelized onion layers.
Step 6: Garnish and Serve Warm
If desired, sprinkle the tops lightly with fresh thyme leaves or a pinch of flaky sea salt just before serving. A tiny dusting of smoked paprika or cayenne at the center of the platter can add a subtle smoky or spicy kick.
Serve the bites while they are still warm and the cheese is gooey. They are wonderful on their own, but you can also offer a small dish of spicy mustard or tomato soup shooters on the side for dipping if you want to lean into the nostalgic grilled-cheese-and-tomato-soup vibe.
Pro Tips
- Take your time with the onions. True caramelization cannot be rushed. If they start to brown too fast or look dry, lower the heat and add a teaspoon of water or two to loosen the fond from the pan.
- Use freshly shredded cheese. Pre-shredded cheddar is convenient but often coated with anti-caking agents, so it does not melt quite as smoothly. A quick pass with a box grater makes a big difference.
- Choose sturdy bread. A slightly denser white, sourdough, or country loaf holds the cheese and onions better than very soft sandwich bread, which can go soggy.
- Keep the heat moderate. Medium-low heat allows the cheese to fully melt by the time the bread is perfectly toasted. Too hot, and the bread will scorch before the center is melty.
- Cut with confidence. Let the sandwiches rest a couple of minutes before slicing, and use a sharp knife with a gentle sawing motion to keep all the layers neatly stacked.
Variations
- Smoky Bacon Cheddar Bites: Add a layer of crisp, crumbled bacon on top of the caramelized onions before adding the final cheese. The smoky, salty bacon is fantastic with the sweet onions.
- Gruyère and Onion Jam Bites: Swap half or all of the cheddar for Gruyère, and add a teaspoon of onion or fig jam with the caramelized onions for an extra-rich, French onion soup–inspired flavor.
- Herby Garlic Bites: Mix 1 small grated garlic clove and 1 tbsp finely chopped fresh herbs (parsley, chives, thyme) into the softened butter before spreading it on the bread for a garlic-bread-meets-grilled-cheese twist.
Storage & Make-Ahead
Caramelized onions: You can make the onions up to 4 days ahead. Let them cool, then refrigerate in an airtight container. Rewarm gently in a skillet over low heat before assembling the sandwiches, adding a teaspoon of water if needed to loosen.
Assembled but uncooked sandwiches: You can build the sandwiches (with cooled caramelized onions) a few hours in advance. Wrap tightly in plastic wrap and refrigerate for up to 6 hours. Bring to room temperature for about 15 minutes, then grill just before serving.
Leftover cooked bites: These are best fresh, but you can refrigerate leftovers in an airtight container for up to 2 days. Reheat on a baking sheet in a 350°F (175°C) oven for 8–10 minutes until warmed through and crisp again. The microwave will soften the bread, so the oven or a skillet is strongly preferred.
Nutrition (per serving)
Approximate values for 4 mini bites (about 1/6 of the recipe): 360 calories, 20 g fat, 11 g saturated fat, 30 g carbohydrates, 2 g fiber, 6 g sugar, 15 g protein, and about 520 mg sodium. Actual values will vary based on the bread, cheese, and exact butter amounts you use.
Leave a Reply