Quick Recipe Version (TL;DR)
Quick Ingredients
- 400 g (3 1/4 cups) all-purpose flour
- 8 g (1 1/2 teaspoons) fine sea salt or table salt
- 1 g (1/4 teaspoon) instant yeast
- 300 g (1 1/4 cups + 1 tablespoon) warm water (about 95–105°F / 35–40°C)
- 1–2 tablespoons cornmeal or flour (for dusting)
- Parchment paper (recommended)
Do This
- 1. Stir flour, salt, and yeast together, then mix in warm water until a shaggy dough forms (no kneading).
- 2. Cover and let ferment at room temperature for 12–18 hours, until bubbly and doubled.
- 3. Shape into a loose round; rest 15 minutes, then tighten into a ball.
- 4. Proof 60–90 minutes on parchment, lightly covered, until puffy.
- 5. Preheat oven and covered Dutch oven at 450°F (232°C) for 30 minutes.
- 6. Bake covered 30 minutes, then uncovered 12–15 minutes until deep golden brown.
- 7. Cool at least 1 hour before slicing for the best texture and flavor.
Why You’ll Love This Recipe
- Minimal effort, big payoff: no kneading, no mixer, and very little hands-on time.
- Deep, bakery-style flavor: an overnight fermentation develops complexity you can taste.
- Crackly crust and airy crumb: a hot Dutch oven creates that artisan-style “steam oven” effect at home.
- Flexible schedule: the dough is forgiving, so it fits real-life timing.
Grocery List
- Produce: None
- Dairy: None
- Pantry: All-purpose flour, fine salt, instant yeast, cornmeal or extra flour (for dusting), parchment paper
Full Ingredients
Overnight No-Knead Dough
- All-purpose flour: 400 g (3 1/4 cups), spooned and leveled
- Fine sea salt or table salt: 8 g (1 1/2 teaspoons)
- Instant yeast: 1 g (1/4 teaspoon)
- Warm water: 300 g (1 1/4 cups + 1 tablespoon), 95–105°F (35–40°C)
For Shaping and Baking
- Cornmeal or flour (for dusting): 1–2 tablespoons (as needed)
- Parchment paper: 1 sheet, about 12 x 16 inches (helps with easy transfer)
Step-by-Step Instructions
Step 1: Mix the dough (no kneading)
In a large bowl, whisk together the 400 g (3 1/4 cups) flour, 8 g (1 1/2 teaspoons) salt, and 1 g (1/4 teaspoon) instant yeast.
Pour in the 300 g warm water and stir with a sturdy spoon or spatula until no dry flour remains. The dough will look shaggy, sticky, and rough. That’s exactly right. Scrape down the sides of the bowl and gather it into a rough mound.
Step 2: Ferment overnight for flavor and bubbles
Cover the bowl tightly (lid, plastic wrap, or a plate). Let the dough sit at cool room temperature (about 68–72°F / 20–22°C) for 12–18 hours.
You’re looking for clear signs of fermentation: the dough should be doubled in size, jiggly, and dotted with bubbles on the surface. If your kitchen is warm, it may be ready closer to 12 hours; if cooler, it may take closer to 18 hours.
Step 3: Shape into a round and let it relax
Lightly flour your work surface. Scrape the dough out of the bowl (a bowl scraper helps). With lightly floured hands, fold the dough over on itself a few times (about 6–8 folds) to form a rough ball. Don’t worry about perfection; you’re just building a little surface tension.
Flip it seam-side down and let it rest 15 minutes uncovered. This short rest helps the flour hydrate and makes final shaping easier.
Step 4: Final shape and proof until puffy
Line a medium bowl with a clean kitchen towel and dust it well with cornmeal or flour. (Alternatively, place the dough directly on a parchment sheet on the counter for the final rise.)
Gently shape the dough into a tighter round: with floured hands, pull the dough toward you against the counter to create a smooth, taut surface. Place it seam-side up into the towel-lined bowl, or seam-side down on parchment.
Cover lightly and proof until noticeably puffy, about 60–90 minutes at room temperature.
Step 5: Preheat the Dutch oven (this makes the crust)
About 30 minutes before baking, place a 5–7 quart Dutch oven with its lid in the oven. Preheat to 450°F (232°C).
This preheat is important: the blazing hot pot gives your loaf a strong “oven spring” (that dramatic rise) and traps steam for a thin, crackly crust.
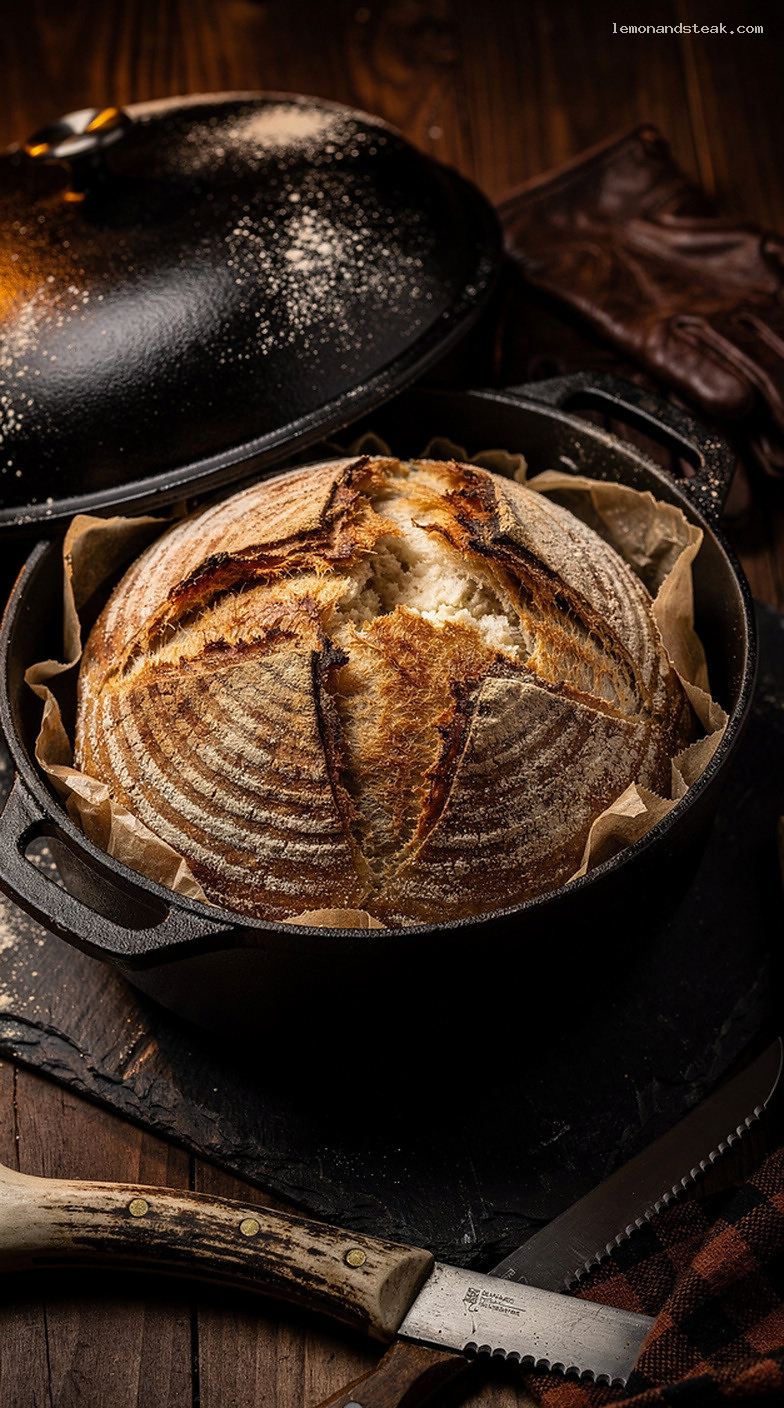
Step 6: Transfer the dough and score
Carefully remove the hot Dutch oven from the oven and set it on a heat-safe surface.
If your dough is in a towel-lined bowl, invert it onto a sheet of parchment so it lands seam-side down. If it’s already on parchment, you’re set. Use a sharp knife or bread lame to score the top with a 1/2-inch-deep slash (one long line or a simple X). Scoring controls where the bread expands.
Lift the loaf by the parchment edges and lower it into the Dutch oven. Put the lid on.
Step 7: Bake covered, then uncovered, and cool completely
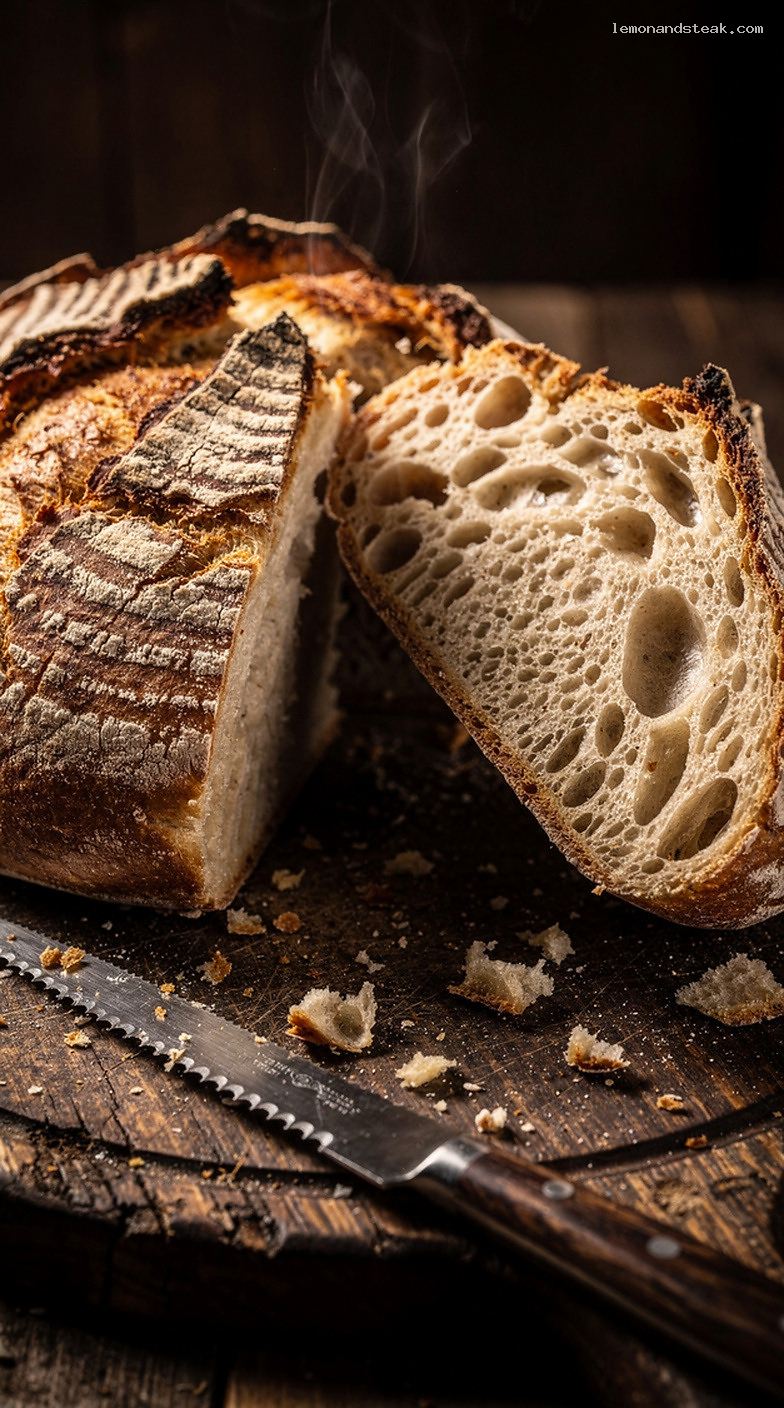
Bake at 450°F (232°C) for 30 minutes covered.
Remove the lid and bake an additional 12–15 minutes uncovered, until the crust is a deep golden brown. For extra confidence, the internal temperature should read 205–210°F (96–99°C) on an instant-read thermometer inserted into the center.
Transfer the loaf to a wire rack and let it cool for at least 1 hour before slicing. Cutting too early can make the crumb gummy, even if the loaf looks done.
Pro Tips
- Weighing ingredients is worth it: bread is especially sensitive to flour measurement. A kitchen scale makes your results more consistent.
- Sticky dough is normal: resist the urge to add lots of extra flour. A lightly floured surface and quick movements are usually enough.
- Control fermentation with temperature: if your kitchen runs hot and the dough seems ready early, shorten the rise. If it’s cool, give it more time until it’s bubbly and expanded.
- Don’t skip the preheated pot: a properly heated Dutch oven is the easiest path to a crackly, artisan crust at home.
- Let it cool fully: the loaf continues setting internally as it cools; this is key for an open, tender crumb.
Variations
- Whole-wheat blend: replace 100 g of the all-purpose flour with 100 g whole wheat flour. Keep water the same, and add 10–20 g more water only if the dough feels unusually stiff.
- Seeded crust: before baking, lightly mist the top with water and sprinkle with 1–2 tablespoons sesame seeds or everything seasoning. Score after topping so the pattern stays clean.
- Olive and herb loaf: fold in 75 g chopped pitted olives and 1 tablespoon chopped rosemary during Step 3. (The dough may proof slightly faster.)
Storage & Make-Ahead
Let the loaf cool completely, then store it cut-side down on a cutting board for up to 24 hours to keep the crust crisp. For longer storage, place in a paper bag or loosely in a bread bag at room temperature for up to 3 days. Avoid airtight plastic if you want to preserve the crust (it softens quickly).
For freezing, slice the cooled bread and freeze in a zip-top bag for up to 2 months. Toast slices straight from frozen, or re-crisp a whole thawed loaf in a 350°F (177°C) oven for 10–12 minutes.
Make-ahead timing: mix the dough at night, bake the next day. If needed, you can extend the first rise to 18 hours in a cooler room, but don’t let it overproof to the point that it collapses.
Nutrition (per serving)
Approximate, per slice (1/10 loaf): 150 calories; 31 g carbohydrates; 5 g protein; 1 g fat; 1 g fiber; 390 mg sodium.
Leave a Reply