Quick Recipe Version (TL;DR)
Quick Ingredients
- 3 cups (375 g) all-purpose flour
- 1 tsp fine salt + 1 1/2 tbsp kosher salt (for water)
- 1 large egg
- 3/4 cup (180 ml) warm water
- 2 tbsp (28 g) melted butter + 4 tbsp (56 g) for filling
- 2 tbsp (30 ml) sour cream
- 2 lb (900 g) potatoes, peeled and cubed
- 1/3 cup (80 ml) warm whole milk
- 1 1/2 cups (170 g) shredded sharp cheddar
- 1/2 cup (110 g) farmer’s cheese or well-drained ricotta
- Black pepper, optional garlic powder, chopped chives
- 6 tbsp (85 g) butter, for pan-searing
- 1 medium onion, thinly sliced (optional, for serving)
Do This
- 1. Make dough: Mix flour and salt, add egg, warm water, melted butter, and sour cream. Knead 5–7 minutes until smooth; rest 30 minutes covered.
- 2. Cook potatoes in salted water until tender, 12–15 minutes. Drain well and mash until smooth.
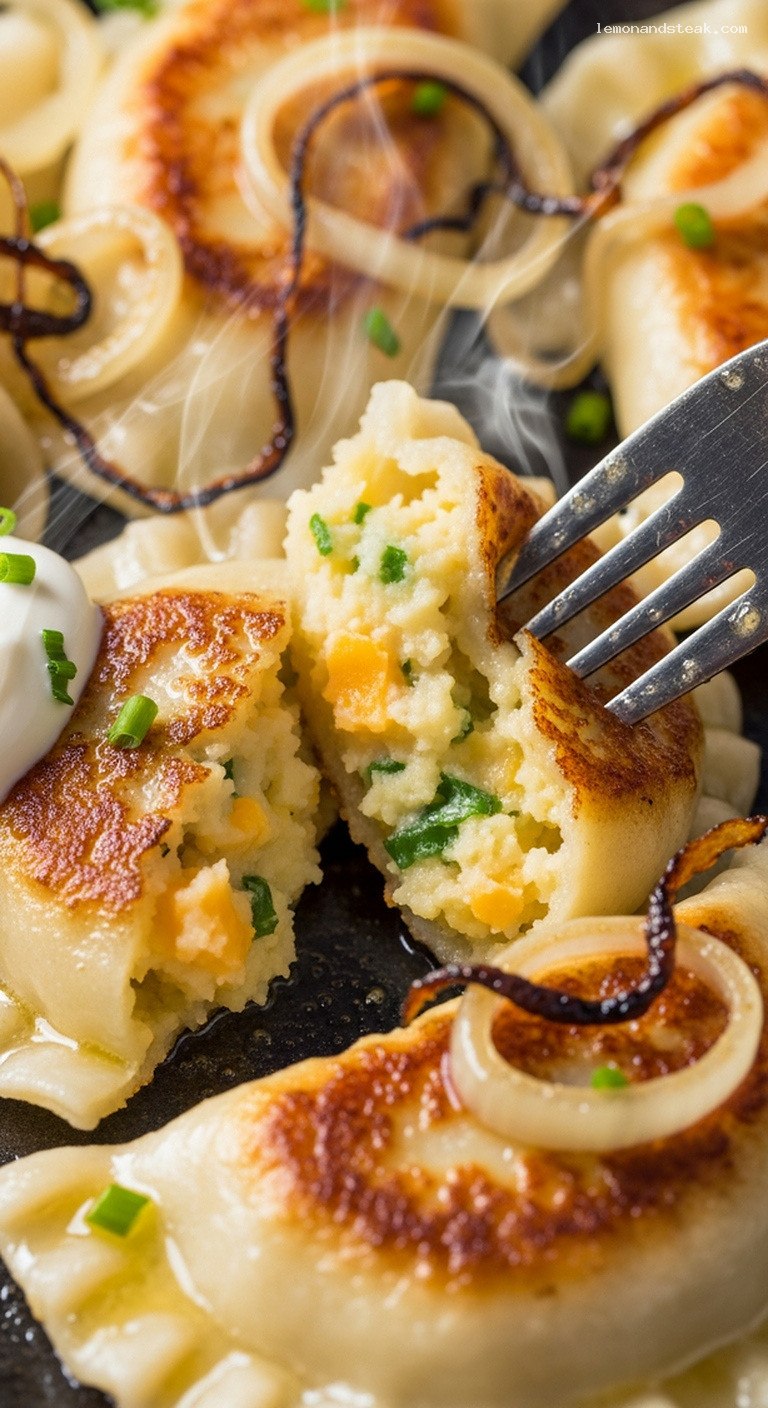
- 3. Stir butter, warm milk, cheddar, farmer’s cheese, pepper, garlic powder, and chives into potatoes. Cool filling completely.
- 4. Roll half the dough to about 1/8 inch (3 mm) thick. Cut 3 inch (7.5 cm) circles. Keep scraps and remaining dough covered.
- 5. Fill each circle with about 1 tbsp filling, fold into a half-moon, and pinch edges firmly to seal. Place on a floured tray.
- 6. Boil pierogi in salted, gently boiling water until they float plus 2–3 minutes. Drain onto a lightly oiled tray.
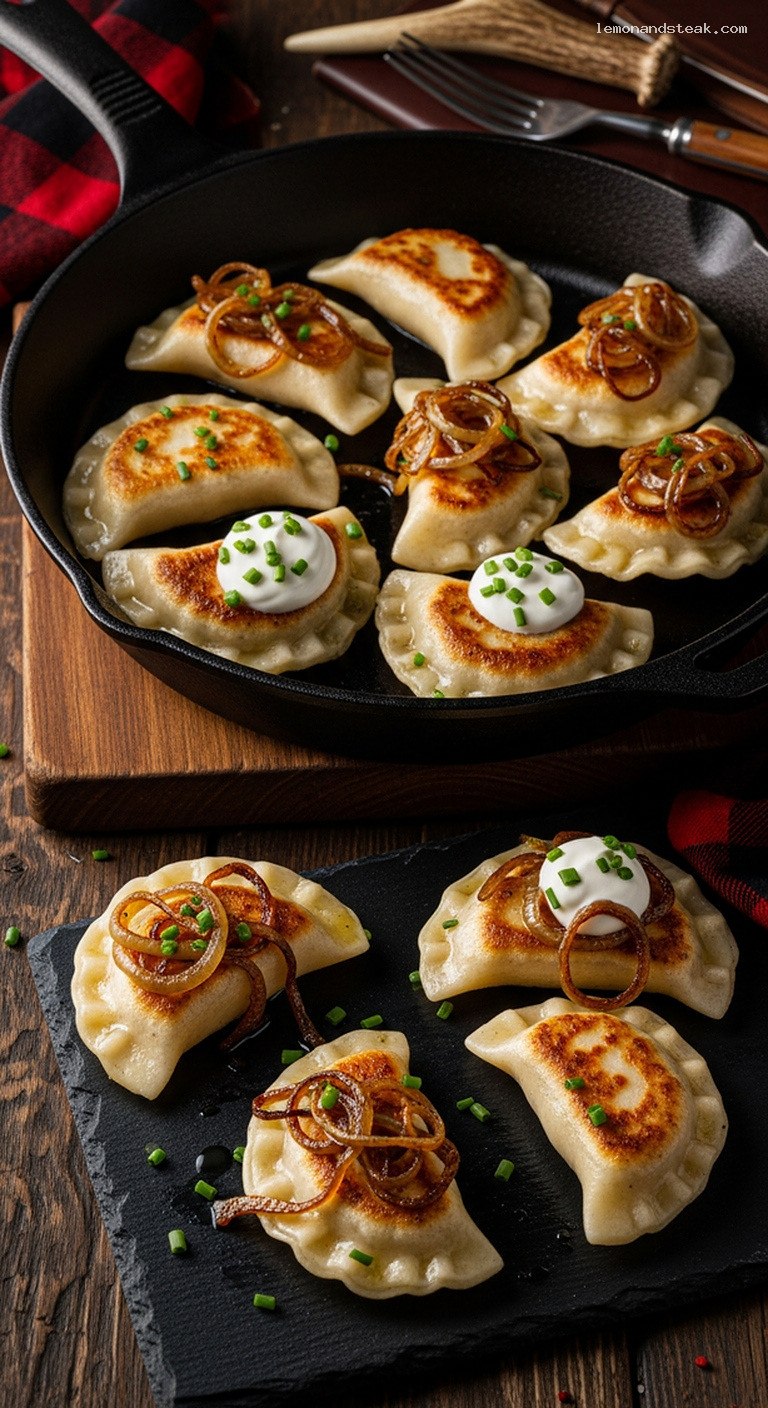
- 7. Pan-sear in butter over medium heat 2–3 minutes per side until golden and lightly crisp. Serve hot with onions, sour cream, and chives.
Why You’ll Love This Recipe
- Classic comfort food: pillowy dough wrapped around fluffy mashed potatoes and sharp, tangy cheese.
- Perfect texture: boiled until tender, then pan-seared in butter for a light, crisp exterior.
- Make-ahead friendly: assemble and freeze for quick, cozy dinners later.
- Flexible and forgiving: simple ingredients with lots of room for your own twists.
Grocery List
- Produce: Potatoes, yellow onion (optional), chives or green onions.
- Dairy: Unsalted butter, sour cream, whole milk, sharp cheddar cheese, farmer’s cheese or ricotta, 1 large egg.
- Pantry: All-purpose flour, fine salt, kosher salt, black pepper, garlic powder (optional).
Full Ingredients
For the Pierogi Dough
- 3 cups (375 g) all-purpose flour, plus extra for dusting
- 1 tsp fine sea salt
- 1 large egg
- 3/4 cup (180 ml) warm water
- 2 tbsp (28 g) unsalted butter, melted and slightly cooled
- 2 tbsp (30 ml) sour cream
For the Potato & Cheese Filling
- 2 lb (900 g) starchy potatoes, such as Russet or Yukon Gold, peeled and cut into 1 inch (2.5 cm) chunks
- 2 tsp fine salt, divided (1 tsp for boiling potatoes, 1 tsp for seasoning the filling)
- 4 tbsp (56 g) unsalted butter
- 1/3 cup (80 ml) whole milk, warmed
- 1 1/2 cups (170 g) shredded sharp cheddar cheese, packed
- 1/2 cup (110 g) farmer’s cheese or well-drained full-fat ricotta
- 1/2 tsp freshly ground black pepper, or to taste
- 1/4 tsp garlic powder (optional, for subtle savoriness)
- 2 tbsp finely chopped fresh chives or green onion greens
For Boiling & Finishing
- 4 qt (3.8 L) water
- 1 1/2 tbsp kosher salt (for the boiling water)
- 6 tbsp (85 g) unsalted butter, for pan-searing
- 1 medium yellow onion, thinly sliced (optional but highly recommended)
Optional Toppings
- Sour cream
- Extra chopped chives or green onion greens
- Freshly ground black pepper
Step-by-Step Instructions
Step 1: Make a Soft, Elastic Pierogi Dough
In a large mixing bowl, whisk together the flour and 1 teaspoon fine salt. In a separate bowl or measuring jug, lightly beat the egg, then whisk in the warm water, melted butter, and sour cream until mostly smooth.
Make a well in the center of the flour and pour in the wet mixture. Stir with a fork or wooden spoon until a shaggy dough forms. Turn the dough out onto a lightly floured surface and knead for 5–7 minutes, adding only a dusting of flour as needed, until the dough is smooth, soft, and slightly tacky but not sticky.
Shape into a ball, place in a lightly floured bowl, and cover tightly with plastic wrap or a damp kitchen towel. Let rest at room temperature for at least 30 minutes. This rest time relaxes the gluten so the dough rolls out easily and stays tender.
Step 2: Cook and Mash the Potatoes
While the dough rests, place the peeled, cubed potatoes in a large pot and cover with cold water by about 1 inch (2.5 cm). Add 1 teaspoon fine salt. Bring to a boil over medium-high heat, then reduce to a gentle boil and cook until the potatoes are very tender when pierced with a fork, about 12–15 minutes.
Drain the potatoes very well in a colander, then return them to the hot pot. Set the pot over low heat for 1–2 minutes, shaking occasionally, to let excess moisture steam off. Remove from heat and mash the potatoes until completely smooth and fluffy, with no noticeable lumps. A potato masher, ricer, or food mill all work well.
Step 3: Make the Savory Potato & Sharp Cheese Filling
While the potatoes are still warm, add the 4 tablespoons butter and mash until fully melted and incorporated. Pour in the warm milk and continue mashing or stirring until the mixture is smooth and creamy, but not runny.
Stir in the shredded sharp cheddar and farmer’s cheese (or drained ricotta) until the cheeses are evenly distributed and mostly melted into the potatoes. Season with the remaining 1 teaspoon fine salt, black pepper, and garlic powder (if using). Add the chopped chives or green onion greens and stir to combine.
Taste and adjust seasoning as needed; the filling should be well seasoned, since the dough is mild. Spread the filling out in a shallow bowl or dish and let it cool to room temperature. A cooler filling is much easier to scoop and seal inside the dough without leaking.
Step 4: Roll Out the Dough and Cut Circles
Lightly flour your work surface. Divide the rested dough into 2 equal pieces. Keep one piece covered while you work with the other. Using a rolling pin, roll the dough out to about 1/8 inch (3 mm) thick. Try to keep it as even as possible so the pierogi cook uniformly.
Use a 3 inch (7.5 cm) round cutter, drinking glass, or jar ring to cut circles from the dough. Gather the scraps, cover them, and set aside to re-roll once you have used the main sheet. To prevent sticking, lightly dust the cut circles with flour and cover them with a clean kitchen towel while you work.
Prepare a large baking sheet by dusting it generously with flour or lining it with parchment paper. This will be where you place the shaped pierogi.
Step 5: Fill and Seal Each Pieróg
Place one dough circle in the palm of your hand or on the work surface. Add about 1 tablespoon of the cooled potato and cheese filling slightly off-center, leaving at least a 1/4 inch (6 mm) border all around. Do not overfill, or the seams may burst during cooking.
Lightly moisten the edge of the dough with a fingertip dipped in water (this helps it seal). Fold the dough over the filling to form a half-moon shape, gently pressing out any trapped air around the filling. Pinch the edges together very firmly from one end to the other. You can leave them as a plain crimp, or decoratively flute them by pressing with the tines of a fork.
Place the sealed pierogi on the prepared baking sheet in a single layer. Repeat with the remaining dough circles, re-rolling scraps as needed, then roll and fill the second half of the dough. Keep the shaped pierogi lightly covered with a kitchen towel to prevent drying while you finish the batch.
Step 6: Boil the Pierogi Until Tender
Bring 4 quarts (3.8 L) of water to a boil in a large pot. Add the 1 1/2 tablespoons kosher salt. Reduce the heat slightly so the water is at a steady but gentle boil; very aggressive boiling can cause the pierogi to split.
Working in batches of about 10–12 pierogi, gently slide them into the water, stirring once or twice with a wooden spoon to prevent sticking to the bottom. As they cook, they will float to the surface. Once they float, cook for an additional 2–3 minutes until the dough is cooked through and slightly puffed.
Use a slotted spoon to transfer the boiled pierogi to a lightly oiled tray or a tray lined with parchment. Do not stack them directly on top of one another while very hot, or they may stick together. At this point, they are ready to pan-sear, or you can let them cool completely for freezing or reheating later.
Step 7: Pan-Sear in Butter Until Lightly Crisp and Serve
In a large skillet (cast iron works beautifully), melt 2 tablespoons of the butter over medium heat. If using onion, add the sliced onion and cook, stirring occasionally, until soft and deeply golden, about 10–15 minutes. Transfer the onions to a bowl and set aside, leaving any remaining butter in the pan.
Add another 2 tablespoons butter to the skillet. When it foams, add a single layer of boiled pierogi (do not overcrowd). Cook over medium heat for 2–3 minutes per side, until the bottoms are golden brown with crisp spots and the dough edges are lightly crisp while the centers stay soft and tender. Add more butter as needed for additional batches.
Serve the pierogi hot, topped with the caramelized onions, a dollop of sour cream, extra chives or green onions, and a grind of black pepper. Enjoy immediately while the centers are warm and the outsides are delicately crisp.
Pro Tips
- Keep the dough soft, not dry: If the dough feels stiff or cracks when you roll it, knead in 1–2 teaspoons of warm water at a time until it is supple. A slightly tacky dough makes tender pierogi.
- Cool the filling before shaping: A warm filling can steam inside the dough and cause the seams to open. Let the potato mixture cool to room temperature before using.
- Seal very firmly: Pinch the edges all the way along, and double-check each pieróg before boiling. Any gaps can cause the filling to leak into the water.
- Boil gently, not furiously: A rolling boil is more likely to tear the dough. A strong simmer with occasional bubbles is perfect.
- Use plenty of butter when searing: The butter is what gives the pierogi their beautiful golden spots and rich, nutty flavor. Do not be shy with it.
Variations
- Extra-oniony filling: Stir 1/2 cup of finely sautéed onions into the potato mixture for a deeper, sweeter flavor throughout the pierogi.
- Herb and cheese twist: Swap cheddar for a mix of sharp cheddar and smoked gouda, and add extra chives, parsley, or dill for a more aromatic filling.
- Spicy version: Add a pinch of cayenne pepper or a few tablespoons of finely diced pickled jalapeños to the filling for gentle heat that cuts through the richness.
Storage & Make-Ahead
Refrigerator: Boiled pierogi keep well in an airtight container in the refrigerator for up to 3 days. To reheat, pan-sear in butter straight from the fridge over medium heat until hot and crisp again, 3–4 minutes per side.
Freezer (best for long-term): Arrange uncooked, shaped pierogi in a single layer on a floured or parchment-lined baking sheet. Freeze until solid, 1–2 hours, then transfer to a freezer bag, pressing out excess air. Freeze for up to 3 months. Cook from frozen by boiling directly (add 1–2 extra minutes), then pan-searing in butter as directed.
Make-ahead components: The filling can be made up to 2 days ahead and stored in the refrigerator. The dough can be made up to 24 hours ahead; wrap it tightly and refrigerate, then bring it back to room temperature for 20–30 minutes before rolling.
Nutrition (per serving)
Approximate values per serving (about 6–7 pierogi, without toppings): 710 calories; 34 g fat; 72 g carbohydrates; 21 g protein; 4 g fiber; 1050 mg sodium. Actual values will vary based on exact ingredients, cheeses used, and portion sizes.
Leave a Reply