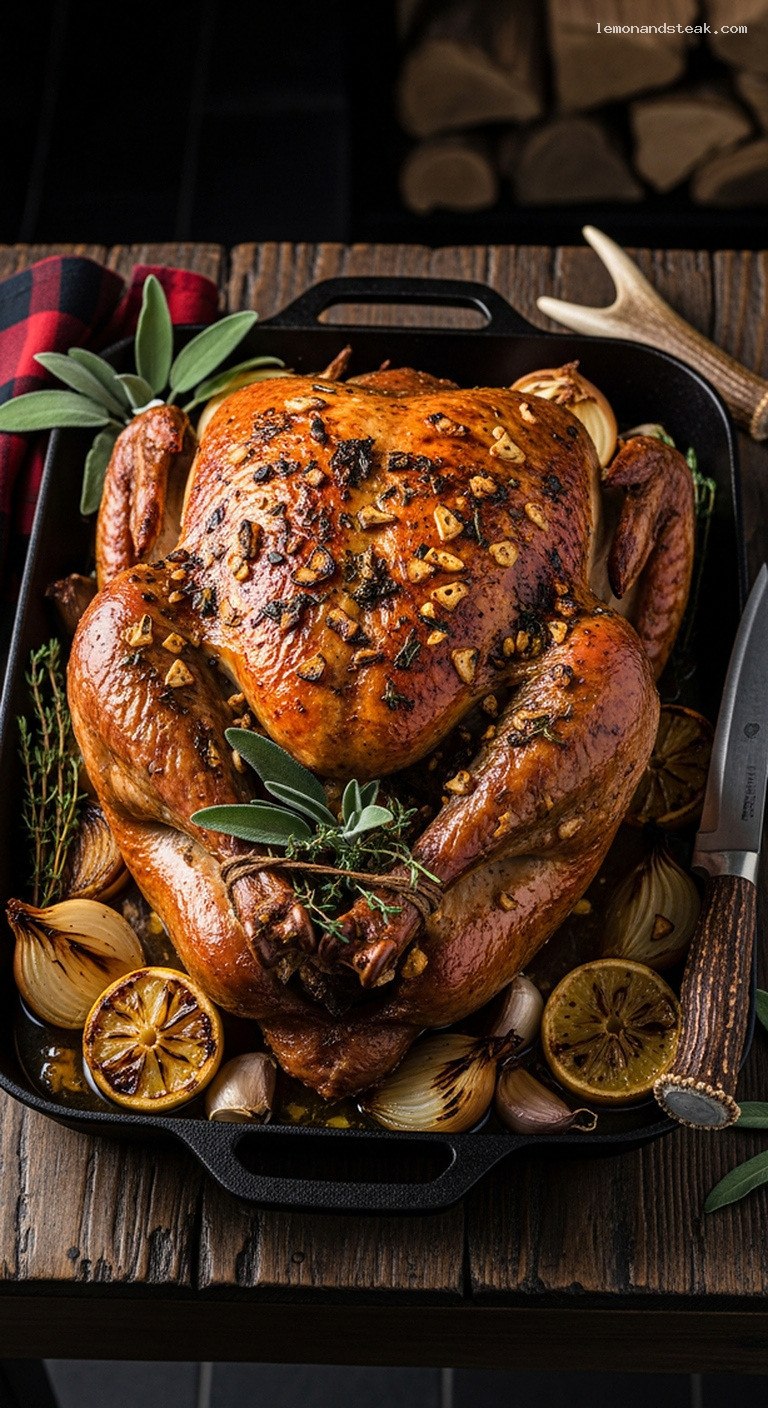
Garlic-Sage Roast Turkey with Subtle Soy Umami
Quick Recipe Version (TL;DR)
Quick Ingredients
- 1 whole turkey (12–14 lb), thawed
- 8 tbsp unsalted butter, softened
- 6 garlic cloves, finely minced
- 3 tbsp finely chopped fresh sage
- 1 tbsp chopped fresh thyme (or 1 tsp dried)
- 2 tbsp low-sodium soy sauce
- 1 1/2 tsp kosher salt (for butter) + 1 tbsp for turkey
- 1 tsp freshly ground black pepper
- 1 large onion, quartered
- 1 lemon, halved
- 1 head garlic, halved
- 2–2 1/2 cups low-sodium chicken or turkey broth
- Optional: flour and extra soy sauce for gravy
Do This
- 1. Pat turkey very dry, remove giblets, and let it sit at room temperature for 45–60 minutes before roasting.
- 2. Mix softened butter with minced garlic, chopped sage, thyme, soy sauce, 1 1/2 tsp salt, and pepper.
- 3. Loosen the turkey skin over the breasts and thighs; rub half the butter under the skin and the rest all over the outside. Season the cavity and skin with remaining 1 tbsp salt.
- 4. Place onion, lemon, halved garlic head, and herb sprigs in the cavity and roasting pan. Pour 2 cups broth into the pan.
- 5. Roast at 425°F (220°C) for 20 minutes, then reduce to 325°F (165°C) and roast 2 1/2–3 hours, basting every 30–40 minutes.
- 6. Turkey is done when thigh reaches 170–175°F (77–80°C) and breast 160–165°F (71–74°C). Tent with foil if browning too quickly.
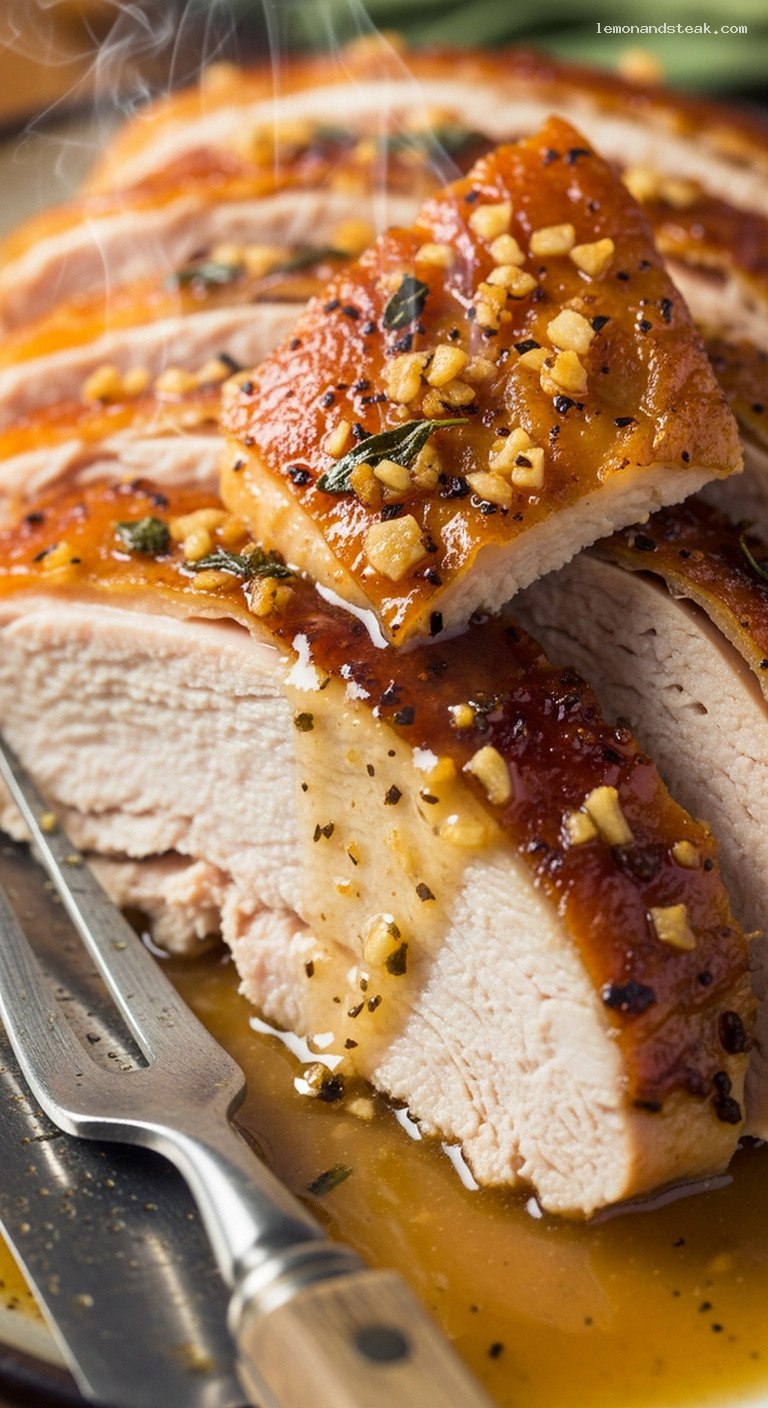
- 7. Rest 30–45 minutes before carving. Use pan drippings plus a splash of soy sauce to make an optional gravy.
Why You’ll Love This Recipe
- The soy sauce adds gentle, cozy umami without making the turkey taste “Asian” or non-traditional.
- Garlic and fresh sage perfume the meat and skin with classic holiday flavors.
- A simple compound butter keeps the turkey juicy and the skin beautifully golden and crisp.
- Clear, step-by-step instructions guide you from thawing to carving, even if this is your first whole turkey.
Grocery List
- Produce: 1 large yellow onion, 1 lemon, 1 head garlic, 6 extra garlic cloves, fresh sage, fresh thyme (optional fresh rosemary for variation)
- Dairy: Unsalted butter (1 standard 8-tbsp stick; have extra on hand if making a large batch of gravy)
- Pantry: Whole turkey (12–14 lb), low-sodium soy sauce, low-sodium chicken or turkey broth, kosher salt, black pepper, all-purpose flour (for gravy), optional paprika and olive oil
Full Ingredients
For the Turkey
- 1 whole turkey, 12–14 lb, fully thawed
- 1 tbsp kosher salt (for seasoning the turkey, in addition to the salt in the butter)
- 1/2 tsp freshly ground black pepper (optional extra for the surface)
For the Garlic-Sage Soy Butter
- 8 tbsp (1 stick) unsalted butter, softened to room temperature
- 6 large garlic cloves, very finely minced or grated
- 3 tbsp finely chopped fresh sage
- or 1 tbsp dried rubbed sage
- 1 tbsp finely chopped fresh thyme leaves
- or 1 tsp dried thyme
- 2 tbsp low-sodium soy sauce
- 1 1/2 tsp kosher salt
- 1 tsp freshly ground black pepper
- 1 tsp paprika (optional, for color)
For the Roasting Pan and Aromatics
- 1 large yellow onion, peeled and quartered
- 1 lemon, halved
- 1 whole head garlic, halved crosswise
- 2–3 sprigs fresh sage (or 1 tsp dried sage)
- 3–4 sprigs fresh thyme (or 1 tsp dried thyme)
- 2–2 1/2 cups low-sodium chicken or turkey broth, divided
- 1–2 tbsp olive oil (optional, if you want extra shine on the skin)
Optional: Simple Soy-Sage Pan Gravy
- 3 tbsp fat skimmed from turkey drippings (or unsalted butter)
- 3 tbsp all-purpose flour
- 2–2 1/2 cups defatted pan juices plus extra broth as needed
- 1–2 tsp low-sodium soy sauce, to taste
- Salt and freshly ground black pepper, to taste
- Optional: a pinch of chopped fresh sage or thyme for brightness
Step-by-Step Instructions
Step 1: Thaw and Dry the Turkey
If your turkey is frozen, thaw it in the refrigerator several days ahead. As a rough guide, allow about 24 hours of fridge time per 4–5 lb of turkey (a 12–14 lb bird usually needs 3–4 days). Keep it in a rimmed pan to catch any juices.
On cooking day, remove the turkey from its packaging. Take out the neck and giblet bag from the cavity (check both main cavity and neck cavity). Pat the turkey very dry, inside and out, with plenty of paper towels. A dry surface is key for crisp, golden skin.
For the most even cooking, let the turkey sit at cool room temperature for 45–60 minutes while you prepare the garlic-sage soy butter and aromatics.
Step 2: Make the Garlic-Sage Soy Butter
In a medium bowl, combine the softened butter, minced garlic, chopped sage, thyme, soy sauce, 1 1/2 tsp kosher salt, 1 tsp black pepper, and paprika (if using). Mash everything together with a fork until you have a smooth, evenly seasoned compound butter.
Taste a tiny bit of the butter. It should be well salted and savory but not aggressively salty. Remember, this butter will season a large amount of meat, and some salt will drip off into the pan during roasting.
Step 3: Season the Turkey Inside and Out
Sprinkle about half of the remaining 1 tbsp kosher salt inside the cavity of the turkey. Add a few grinds of black pepper if you like. Stuff the cavity loosely with the onion quarters, lemon halves, halved garlic head, and a few sprigs of sage and thyme. Do not pack it tightly; air should still circulate for even cooking.
Now, gently loosen the skin over the breasts: slide your fingers under the skin at the cavity end and carefully work your hand up toward the top of the breast, separating skin from meat without tearing. You can also loosen a bit of skin over the upper thighs.
Spread about half of the garlic-sage soy butter under the loosened skin over both breasts (and thighs, if accessible), pressing it around so it forms an even layer. Rub the remaining butter all over the outside of the turkey, including the legs and wings.
Sprinkle the remaining salt and, if desired, a little more pepper over the outside of the turkey. If you like, rub 1–2 tbsp olive oil over the skin to enhance browning and shine.
Step 4: Set Up the Roasting Pan
Preheat your oven to 425°F (220°C). Position a rack in the lower third of the oven so the turkey will sit roughly in the center once placed inside.
Place a sturdy roasting rack inside a large roasting pan. Scatter any extra onion pieces, garlic halves, lemon pieces, and herb sprigs in the bottom of the pan. Pour 2 cups of broth into the pan; this will keep drippings from burning and will form the base of your pan juices and gravy.
Set the prepared turkey breast-side up on the roasting rack. Tuck the wing tips behind the bird so they do not burn. If you like, loosely tie the legs together with kitchen twine for a neater shape and slightly more even cooking.
Step 5: Roast the Turkey to Golden Perfection
Place the turkey in the hot oven and roast at 425°F (220°C) for 20 minutes. This brief blast of higher heat helps set the skin and begin browning.
After 20 minutes, reduce the oven temperature to 325°F (165°C) without opening the door if possible. Continue roasting for about 2 1/2–3 hours, depending on the exact size of your turkey. As a general guideline, plan for a total roasting time of about 13–15 minutes per pound, including the initial high-heat phase.
After the first hour at 325°F, start basting the turkey every 30–40 minutes with the pan juices. Tilt the pan slightly, spoon up the flavorful liquid, and gently drizzle it over the breasts and legs. If the pan ever looks dry, add another 1/2 cup broth.
If the skin is browning too quickly before the meat is done, lightly tent the breast area with a piece of foil and continue roasting.
Step 6: Check Doneness and Rest the Turkey
Begin checking the internal temperature during the last 45 minutes of roasting. Use an instant-read thermometer inserted into the thickest part of the thigh (without touching bone) and the thickest part of the breast.
The turkey is ready when the thigh registers 170–175°F (77–80°C) and the breast reaches 160–165°F (71–74°C). If one area is lagging behind, you can tent the part that is already done with foil while the rest finishes.
Carefully transfer the turkey to a carving board or platter, tent loosely with foil, and let it rest for 30–45 minutes. Resting allows the juices to redistribute so the meat stays moist when you carve.
While the turkey rests, pour the pan drippings through a fine-mesh strainer into a fat separator or a heatproof bowl. Let the fat rise to the top, then skim off 3 tbsp for gravy (or more if you are making a large batch).
Step 7: Make the Soy-Sage Pan Gravy (Optional but Recommended)
Measure out 2–2 1/2 cups of the defatted pan juices and, if needed, top off with extra broth to reach that amount. Taste the liquid; it should already have a gentle soy-sage flavor from the rub.
In a medium saucepan over medium heat, add 3 tbsp of the skimmed turkey fat (or butter). Sprinkle in the flour and whisk constantly for 1–2 minutes to form a smooth, bubbling roux that smells slightly nutty but not burned.
Slowly pour in the pan juices while whisking. Bring to a simmer and cook, stirring often, until the gravy thickens to your liking, 5–8 minutes. If it becomes too thick, whisk in a splash more broth.
Season with 1–2 tsp soy sauce to deepen the savoriness, plus salt and pepper to taste. For a fresh note, stir in a pinch of chopped sage or thyme. Keep the gravy warm over very low heat until serving, whisking occasionally.
Pro Tips
- Dry-brine for extra flavor: For even deeper seasoning, salt the turkey (using the 1 tbsp salt for the bird) up to 24 hours in advance and leave it uncovered in the fridge. Pat dry again before adding the garlic-sage soy butter.
- Get under the skin: The butter under the breast skin is what keeps the white meat juicy. Work slowly with warm hands so you do not tear the skin.
- Use a thermometer, not just time: Oven temperatures and turkey sizes vary. Rely on internal temperatures for perfectly cooked meat rather than only the clock.
- Do not over-baste early: Wait until after the first hour at 325°F to start basting. Early on, you want the skin to set and begin crisping.
- Let it rest generously: A 30–45 minute rest feels long but makes carving easier and the meat noticeably juicier.
Variations
- Citrus-Herb Soy Turkey: Add the finely grated zest of 1 lemon and 1 orange to the garlic-sage soy butter. Reduce soy sauce to 1 1/2 tbsp for a brighter, more citrus-forward flavor that still has gentle umami.
- Maple-Soy Glazed Finish: In the last 20 minutes of roasting, brush the turkey with a mixture of 2 tbsp pure maple syrup and 1 tbsp soy sauce. This creates a glossy, lightly sweet-savory finish that complements the sage and garlic.
- Turkey Breast Only: Use a 5–7 lb bone-in turkey breast. Halve the butter recipe, roast at 375°F (190°C) for about 1 3/4–2 1/4 hours, and pull when the thickest part reaches 160–165°F (71–74°C).
Storage & Make-Ahead
Refrigerate leftover turkey in shallow, airtight containers within 2 hours of serving. It will keep for 3–4 days in the fridge. For longer storage, freeze sliced turkey in well-wrapped portions (with a bit of gravy or pan juices to prevent dryness) for up to 2–3 months. Thaw overnight in the refrigerator before reheating.
The garlic-sage soy butter can be made 3 days ahead and refrigerated, or up to 1 month ahead and frozen. Bring it back to a spreadable consistency before using. You can also prep the aromatics (onion, lemon, herbs) a day in advance and keep them chilled. Gravy keeps well in the fridge for 3–4 days and can be reheated gently on the stovetop with a splash of broth to loosen.
Nutrition (per serving)
Approximate values per serving (about 6 oz cooked turkey with some skin and a spoonful of gravy), based on 12 servings from a 12–14 lb turkey:
Calories: ~380 kcal; Protein: ~32 g; Fat: ~26 g; Saturated Fat: ~10 g; Carbohydrates: ~3 g; Fiber: 0 g; Sugar: ~1 g; Sodium: ~520 mg. Actual values will vary with portion size, how much skin and gravy you serve, and the specific broth and soy sauce brands used.
Leave a Reply