Quick Recipe Version (TL;DR)
Quick Ingredients
- 12 small cremini or white button mushrooms (about 8 oz / 225 g)
- 3 oz (85 g) cream cheese, softened
- 1/2 cup (60 g) finely shredded mozzarella cheese
- 2 tbsp grated Parmesan cheese
- 1 small garlic clove, minced (or 1/2 tsp garlic powder)
- 1 tbsp chopped fresh parsley (plus extra to garnish)
- 1 tbsp panko breadcrumbs (optional, for crunch)
- 2 tsp olive oil, divided
- 1/4 tsp kosher salt, divided
- 1/4 tsp black pepper, divided
- Pinch red pepper flakes (optional)
Do This
- 1. Heat broiler on High and move oven rack 4–6 inches from the heat source. Line a small baking sheet with foil.
- 2. Gently clean mushrooms with a damp paper towel. Twist out stems and finely chop the stems.
- 3. In a bowl, mix cream cheese, mozzarella, Parmesan, chopped stems, garlic, parsley, panko, 1 tsp olive oil, 1/8 tsp salt, pepper, and red pepper flakes.
- 4. Lightly brush mushroom caps (outside only) with remaining 1 tsp olive oil and sprinkle with a small pinch of salt and pepper.
- 5. Firmly pack cheese mixture into each cap, mounding it slightly. Place caps filling-side up on the baking sheet.
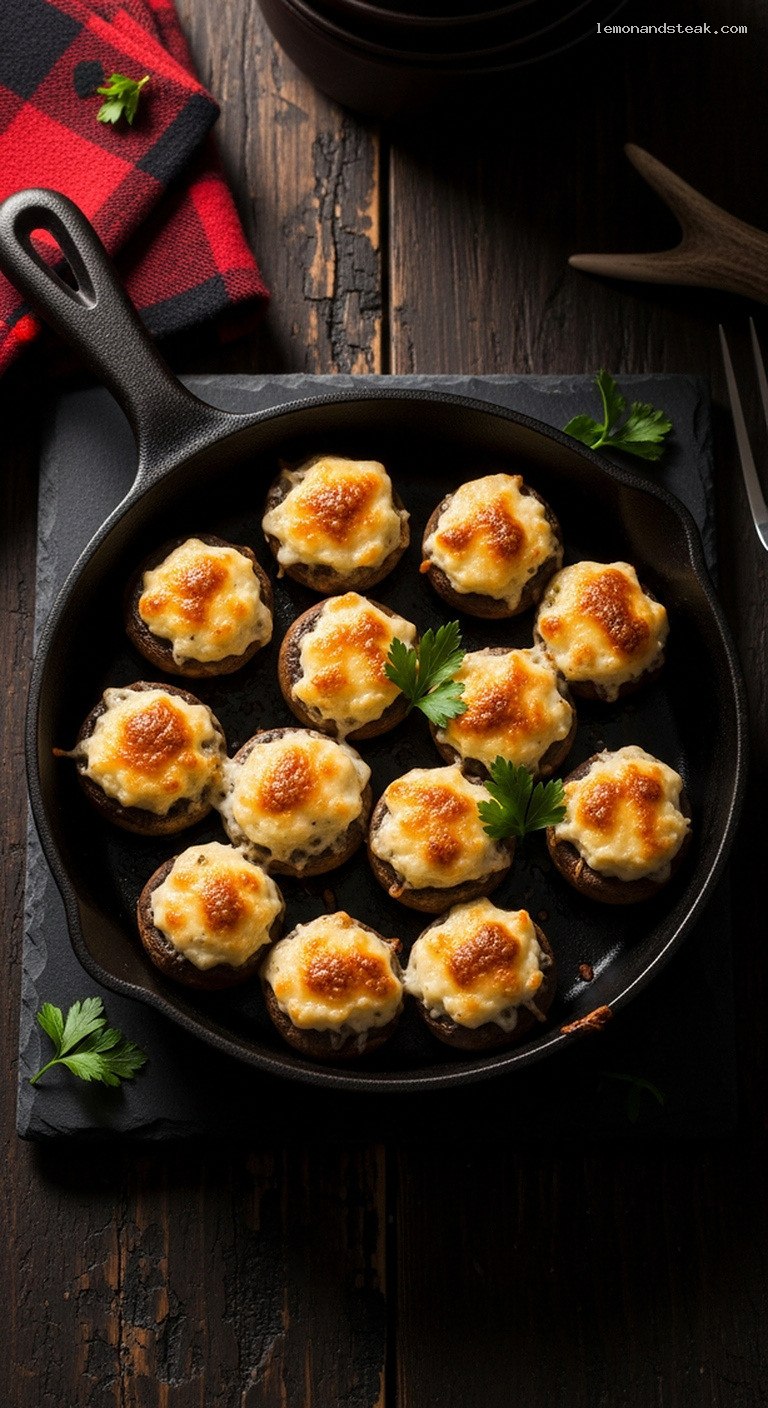
- 6. Broil 6–8 minutes, until cheese is melted, bubbly, and golden in spots. Rest 2 minutes, garnish with parsley, and serve hot.
Why You’ll Love This Recipe
- Bite-sized, cheesy, and deeply savory – perfect for parties or a cozy snack.
- Minimal prep and just one bowl, but it tastes like a restaurant appetizer.
- Broiled instead of baked, so you get a bubbling, golden top in minutes.
- Easy to customize with different cheeses, herbs, or a touch of spice.
Grocery List
- Produce: Small cremini or white button mushrooms, garlic, fresh parsley, optional lemon for serving.
- Dairy: Cream cheese, shredded mozzarella cheese, grated Parmesan cheese, optional butter (if you prefer over olive oil).
- Pantry: Olive oil, panko breadcrumbs, kosher salt, black pepper, red pepper flakes (optional), aluminum foil or parchment.
Full Ingredients
Mushrooms
- 12 small cremini or white button mushrooms, stems removed (about 8 oz / 225 g)
- 1 tsp olive oil (for brushing the mushroom caps)
- Pinch kosher salt
- Pinch freshly ground black pepper
Cheesy Filling
- 3 oz (85 g) cream cheese, softened to room temperature
- 1/2 cup (60 g) finely shredded low-moisture mozzarella cheese
- 2 tbsp (about 10 g) finely grated Parmesan cheese
- Chopped mushroom stems from above (finely minced)
- 1 small garlic clove, very finely minced
Substitute: 1/2 tsp garlic powder if you prefer milder garlic. - 1 tbsp finely chopped fresh flat-leaf parsley
Substitute: 1 tsp dried parsley or Italian seasoning. - 1 tbsp panko breadcrumbs (optional, for a bit of texture)
- 1 tsp olive oil or melted butter
- 1/8 tsp kosher salt
- 1/8 tsp freshly ground black pepper
- Pinch red pepper flakes (optional, for gentle heat)
To Finish
- 1 tsp finely chopped fresh parsley (for garnish)
- Optional: Extra grated Parmesan for sprinkling
- Optional: Small squeeze of lemon juice just before serving for brightness
Step-by-Step Instructions
Step 1: Preheat the broiler and prepare your pan
Set your oven to Broil (High). Adjust an oven rack so it sits about 4–6 inches below the broiler element – this distance helps the cheese brown without burning too quickly.
Line a small, rimmed baking sheet with aluminum foil (for easy cleanup) or parchment that is rated for high heat. Lightly mist or brush the foil with a bit of oil if you like, although the mushrooms usually do not stick much.
Step 2: Clean and prep the mushrooms
Choose small, firm mushrooms that are roughly the same size so they cook evenly. Avoid soaking them in water; mushrooms act like sponges.
Instead, gently wipe each mushroom cap with a damp paper towel or a clean cloth to remove any dirt. Hold each mushroom by the cap, then twist and pull out the stem. Set the caps aside in one bowl and place the stems on a cutting board.
Finely mince the mushroom stems with a sharp knife. These will be folded into the cheese mixture to add flavor and prevent waste.
Step 3: Make the cheesy filling
In a medium mixing bowl, add the softened cream cheese. If it is still cold and stiff, microwave it for about 10 seconds to loosen it slightly. Add the shredded mozzarella, grated Parmesan, and the minced mushroom stems.
Stir in the minced garlic (or garlic powder), chopped parsley, panko breadcrumbs (if using), and 1 tsp olive oil or melted butter. Season with 1/8 tsp kosher salt, 1/8 tsp black pepper, and a pinch of red pepper flakes if you like a slight kick.
Mix thoroughly with a spoon or small spatula until everything is well combined and relatively thick. The mixture should hold together and form a soft mound when scooped.
Step 4: Season the mushroom caps
Place the cleaned mushroom caps, hollow side up, on your prepared baking sheet. Drizzle or brush the outsides of the caps with 1 tsp olive oil. This tiny bit of oil helps them roast nicely and keeps them from drying out under the broiler.
Lightly sprinkle the caps with a pinch of salt and pepper. You do not need much because the filling is already seasoned, but this quick step makes the mushrooms themselves taste better.
Step 5: Stuff the mushrooms generously
Using a small spoon or a teaspoon-size scoop, portion the cheese mixture into each mushroom cap. Firmly press the filling down into the hollow, then gently mound it up so each mushroom has a rounded, slightly heaped top.
Aim to divide the filling evenly among all 12 caps. If a mushroom is smaller, give it a little less; if one is larger, it can handle a bigger scoop. Arrange the stuffed mushrooms filling-side up on the baking sheet, spacing them slightly apart so the heat can circulate.
Step 6: Broil until bubbly and golden
Slide the baking sheet under the broiler. Cook for 6–8 minutes, watching carefully toward the end. The exact time depends on your oven and how close the rack is to the heat.
The mushrooms are ready when the cheese is fully melted, very bubbly, and golden brown in spots, and the mushrooms look tender but not collapsed. If the tops are browning too fast, move the pan to a lower rack and continue for another minute or two.
Remove the pan from the oven and let the mushrooms rest for 2 minutes. This allows the filling to firm up slightly so it is not molten hot when you bite into it.
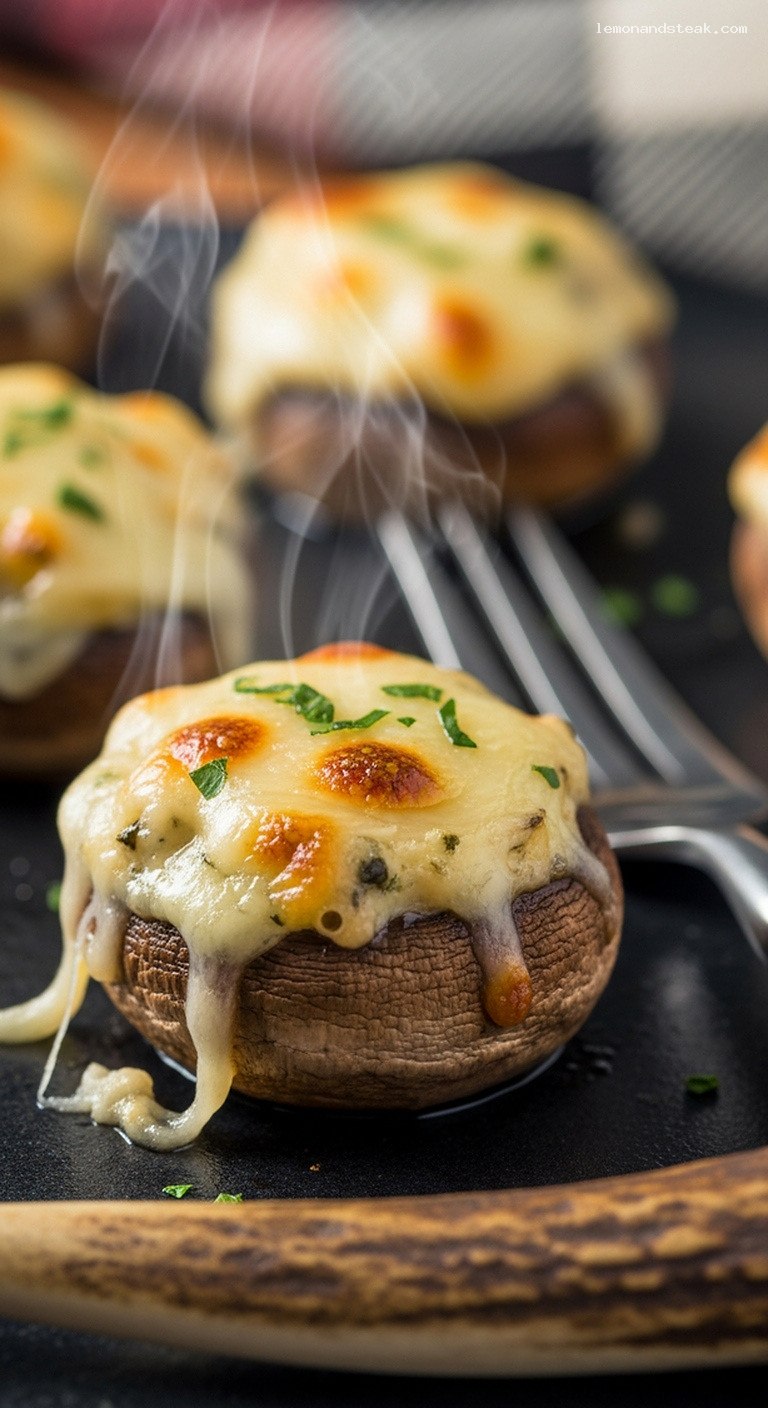
Step 7: Garnish and serve
Sprinkle the tops with a pinch of fresh chopped parsley and, if you like, a light dusting of extra Parmesan. For a subtle brightness that cuts through the richness, you can finish with a very small squeeze of lemon juice over the whole tray.
Transfer the mushrooms to a serving plate or bring the tray straight to the table for a rustic feel. Serve them hot or warm as a bite-sized snack, appetizer, or side alongside a glass of wine, a cocktail, or sparkling water.
Pro Tips
- Dry, do not soak: Wiping mushrooms instead of rinsing keeps them from becoming waterlogged and helps them brown better under the broiler.
- Soften the cream cheese: Room-temperature cream cheese blends easily and gives a smoother, fluffier filling that melts more evenly.
- Watch the broiler closely: Broilers vary a lot. Start checking at 5–6 minutes so the cheese gets golden, not burnt.
- Use small mushrooms: Look for 1–1.5 inch caps for true one-bite snacks. Larger caps work too, but they may need an extra minute or two.
- Pre-mix ahead: The cheese filling can be mixed several hours in advance and refrigerated, making last-minute assembly very quick.
Variations
- Herb and garlic boost: Add 1/4 tsp dried Italian seasoning, extra garlic, and a little lemon zest for a brighter, herbier filling.
- Bacon and cheddar: Swap mozzarella for sharp cheddar and fold in 2–3 tbsp finely crumbled cooked bacon for a smoky, hearty version.
- Spicy kick: Increase red pepper flakes to 1/4 tsp and add a dash of hot sauce to the filling for a more assertive, spicy snack.
Storage & Make-Ahead
To make ahead, you can assemble the stuffed mushrooms up to 1 day in advance. Arrange them on a baking sheet, cover tightly with plastic wrap, and refrigerate. When ready to serve, remove the tray from the fridge while the broiler preheats, then broil as directed, adding 1–2 extra minutes if needed since they are starting cold.
Leftover cooked mushrooms keep best in an airtight container in the refrigerator for up to 3 days. Reheat on a small baking sheet in a 375°F (190°C) oven or under the broiler for a few minutes until warmed through and the cheese is melty again. The texture is best fresh, so try to only make as many as you expect to eat the same day when serving guests.
Nutrition (per serving)
Approximate values per serving (3 mini stuffed mushrooms): about 160 calories, 7 g protein, 13 g fat, 3 g carbohydrates, and 0.5 g fiber. Actual values will vary slightly based on the exact brands and sizes of mushrooms and cheeses you use.
Leave a Reply